2020年12月27日 星期日

OpenCV3(含安裝Python步驟&VSCode設定)


Visual Studio Code與Python環境的設定

https://github.com/twtrubiks/vscode_python_note

Preferences: Open User Settings : 你可以簡單把他想成是全域的。
Preferences: Open Workspace Settings : 只在你的工作目錄內才會生效 ( 工作目錄內會多出一個資料夾 )。

 其他就請參考該網址的介紹。

alt tag
用json方式設定


{
    // User Settings

    "window.zoomLevel": 1, // 視窗縮放
    // "editor.fontSize": 22,
    // "editor.lineHeight": 26,
    // "terminal.integrated.fontSize": 30, // terminal 字體大小
    // "editor.formatOnSave": true, // 當儲存時,是否自動格式化
    "files.autoSave": "onFocusChange", // 是否自動儲存檔案

    // 注意,win 用戶都要使用 "\\"
    //"python.pythonPath": "C:\\Users\\twtru\\Anaconda3\\envs\\venv_temp\\python.exe", // 預設的 PYTHON 執行環境

    "extensions.ignoreRecommendations": true, // 是否忽略顯示建議的套件
    "files.encoding": "utf8", // 設定預設編碼
    "files.trimTrailingWhitespace": true, // 儲存的時候,會幫你自動過濾多餘的空格
    "files.autoGuessEncoding": false, // 是否自動猜測檔案的編碼
    "terminal.integrated.shell.windows": "C:\\WINDOWS\\System32\\cmd.exe",
    // "workbench.welcome.enabled": false, // 使否關閉 vscode 歡迎的顯示頁面
    "workbench.startupEditor": "newUntitledFile",
    "explorer.confirmDelete": false,

    // "workbench.colorTheme": "One Dark Pro", // 需安裝 One Dark Pro
    "workbench.iconTheme": "vscode-icons",  // 需安裝 vscode-icons
}


step1.先安裝python


step2.再安裝Visual Studio Code

備註:
如果使用Visual Studio Code編輯,卻無法在TERMINAL執行python指令,記得執行以下步驟。

WIN7
將python的路徑登入至path中。[系統/進階系統設定/環境變數]

WIN10
 -----------------------------------------------------------------------------
"python -m pip list"指令可以列出目前安裝的套件有哪些。


-----------------------------------------------------------------------------
安裝OpenCV
*pip install opencv-python
*pip install opencv-contrib-python
*pip install pytesseract

1.安裝pip
*先下載get-pip.py程式。
*然後執行python get-pip.py

2.升級pip(輸入如下圖指令)

pip指令所在資料夾

pip命令方式
*要注意*.whl要放對地方
參考圖(非命令)

--------------------------------------------------------------------------------------------------------------------------
*預先下載opencv的模組

本版本為Python 3.8.0 32-bit


Step 1
執行"python -m pip install opencv_python‑4.1.2+contrib‑cp38‑cp38m‑win32.whl"

Step 2
執行"python -m pip install numpy"
numpy
numpy安裝完成
Step 3
下載Matplotlib

執行"python -m pip install matplotlib-3.2.0rc2-cp38-cp38-win32.whl"


Step 4
>>>import numpy
>>>import cv2

可正常執行"numpy"與"cv2"


補充資料--

  1. Download the Opencv binary files here: https://www.lfd.uci.edu/~gohlke/pythonlibs/#opencv
  2. Choose the compatible version of Opencv to your Python. We’ll download the lastest version of Opencv (4.1) for Python 3.6.8.
    How to understand the right version?
    -cp37m-win32.whl means that Opencv is for python 3.7 (32 bit version)
    -cp36m-win_amd64.whl means that Opencv is for python 3.6 (64 bit version)

  3. Run the “Command Prompt” of Windows. You can type “CMD” on the sarch bar to find it.
  4. Go to the directory where the Opencv binaries that you downloaded is located.
    cd YOURPATHfor example in my case:
    cd C:\Users\pinolo\Downloads
  5. Now let’s install the Opencv module using PIP.
    python pip -m install opencv_python‑4.0.1+contrib‑cp37‑cp36m‑win_amd64.whl
  6. Now let’s install Numpy using PIP.
    python pip -m install numpy
  7. The installation is complete. Now we can test it by running python and importing the libraries cv2 (for opencv) and numpy. If we don’t get any error it means that it has been installed succesfully.
--------------------------------------------------------------------------------------------------------------------------
網站技術分享--人臉辨識
https://tpu.thinkpower.com.tw/tpu/articleDetails/950


圖檔格式

OpenCV 的 cv2.imread 在讀取圖片時,可以在第二個參數指定圖片的格式,可用的選項有三種:
cv2.IMREAD_COLOR
此為預設值,這種格式會讀取 RGB 三個 channels 的彩色圖片,而忽略透明度的 channel。
cv2.IMREAD_GRAYSCALE
以灰階的格式來讀取圖片。
cv2.IMREAD_UNCHANGED
讀取圖片中所有的 channels,包含透明度的 channel。

寫入圖片檔案

若要將 NumPy 陣列中儲存的圖片寫入檔案,可以使用 OpenCV 的 cv2.imwrite
# 寫入圖檔
cv2.imwrite('output.jpg', img)
cv2.imwrite 可透過圖片的副檔名來指定輸出的圖檔格式:
# 寫入不同圖檔格式
cv2.imwrite('output.png', img)
cv2.imwrite('output.tiff', img)
輸出圖片檔案時,也可以調整圖片的品質或壓縮率:
# 設定 JPEG 圖片品質為 90(可用值為 0 ~ 100)
cv2.imwrite('output.jpg', img, [cv2.IMWRITE_JPEG_QUALITY, 90])

# 設定 PNG 壓縮層級為 5(可用值為 0 ~ 9)
cv2.imwrite('output.png', img, [cv2.IMWRITE_PNG_COMPRESSION, 5])

安裝Matplotlib
pip install matplotlib-3.2.0rc2-cp38-cp38-win32.whl

--------------------------------------------------------------------------
人臉辨識(FaceDetect)
指令:
python face_detect.py [圖片檔名] [haarcascade.xml]

範例:
python face_detect.py test1.jpg haarcascade_frontalface_alt.xml


..................
*圖面解析度條很高,ScaleFactor調太小的話,CPU會往上衝。
*haarcascade可到opencv\sources\data\haarcascades取得。
*


2020年10月18日 星期日

Inkscape的應用-G碼轉換

使用DVD光碟機要製作一台基于GRBL_CNC_V3繪圖儀需要以下軟體。

 包括:GRBL、Inkscape、Inkscape扩展安装、universal-gcode-sender 2.0。

*Inkscape軟體可轉成*.ngc檔給以下軟體使用。

這些都是可傳Gcode給Arduino及模擬的軟體
 

*目前使用的Inkscape版本為1.0.1


匯入圖檔

轉成點陣圖1

轉成點陣圖2

轉成點陣圖3(移開原圖)

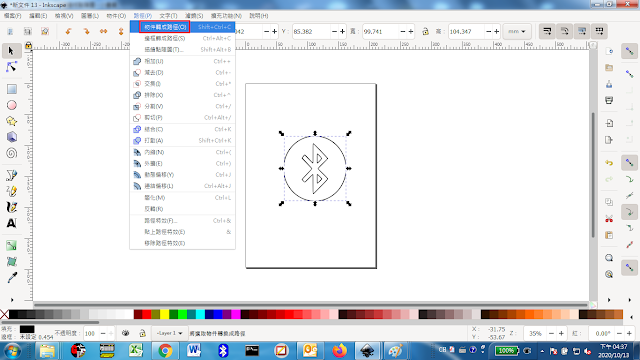
將物件轉成路徑

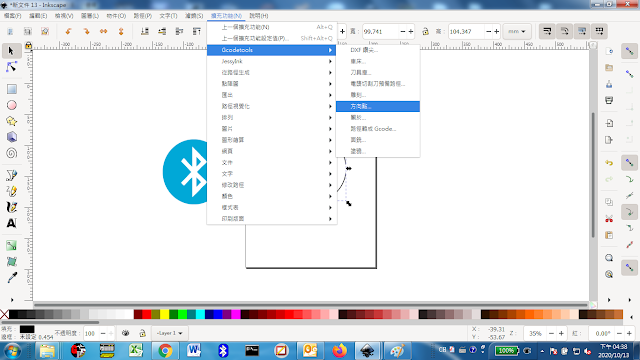
建立方向點1

建立方向點2

建立工具庫1

建立工具庫2

路徑轉G碼1

路徑轉G碼2(建立轉檔的放置目的資料夾)

路徑轉G碼3(開始轉換)

Gcode *.ngc放置的資料夾


inkscape的版本補充(寫字機必看grbl)

 Inkscape原廠網址有很多版本介紹。

https://inkscape.org/zh-hant/release/inkscape-1.0.1/

2020年最新版有'1.0.1

--WIN10安裝可正常開啟,但目前無法用MIGRBL擴充功能(控制伺服舵機)。

--MI就是Mi-extension for z-axis servo controller。

2017年0.92版本

--0.92.2版(64bit)在WIN10底下安裝執行會發生錯誤無法開啟。

--0.92.4版(64bit)在WIN10底下安裝執行可以正常使用。 

可以用了

Win10就是這版本可以

備註:但好像是因為"Mi-extension for z-axis servo controller"太舊轉出來都失敗....

**目前外掛Laser的擴充功能可正常轉出G碼程式讓"SourceRabbit GCode Sender"或"ugsplatform64"Gbrl專用軟體使用。

**終於找到MI可以使用的了!要下圖的日期???

還有問題,似乎要先用"JTP"轉完才能用"MI"才能轉成功? YES

解答:

只要外掛成功可以轉檔成gcode程式就可以了,從頭到尾都是因為沒有將grbl程式灌成功到Arduino UNO版上關係。請參考以下說明#1~


終於~可以用了*都是一開始沒成功將程序傳輸至Arduino
OK

#說明1

如何上傳GRBL檔案到Arduino板子上?

步驟1.可以控制Servo舵機的grbl檔案
 

步驟2.複製到Arduino的資料庫內

步驟3.進入到底層資料夾直接執行"grblUpload"


上傳


進入監控視窗

進入連線狀態可以使用"M3 S0~M3 S180"指令來控制角度

2010年0.48版

2009年0.47版

2008年0.46版

2007年0.45.1版  ---需要擴充"MI模組"才能控制伺服舵機(SG90)


**可以參考看看別人做的~

https://www.thingiverse.com/thing:2349232

** 下面的網址為Laser inkscape外掛模組下載位置

https://jtechphotonics.com/?page_id=1980


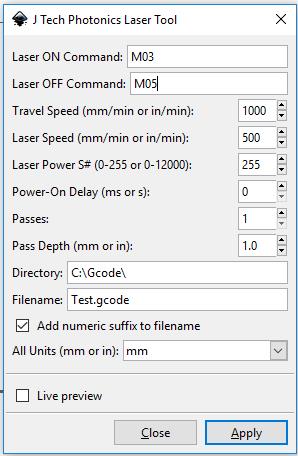
The new plug-in allows for multiple commands for laser on and off for all the different versions of printers as well as the ability for multiple passes for cutting.  Here is a description of the features of the plug-in.

  • Laser ON Command:  The command for turning ON the laser.  For example, M03 or M106.J Tech Laser Tool inkscape picture 2
  • Laser OFF Command: The command for turning OFF the laser.  For example, M05 or M107.
  • Travel Speed:  The speed of the machine when the laser is OFF in mm/min.
  • Laser Speed:  The speed of the machine when the laser is ON in mm/min.
  • Laser Power: If you have PWM control, then you can adjust this.  For J Tech firmware and most 3D printers use a number between 0 and 255 (255 being full power).  For GRBL 0.9 and 1 standard, use a number between 0 and 12000 (12000 being full power).   If you don’t have PWM, keep at max power (either 255 or 12000).
  • Power On Delay:  This will turn on the laser and wait to move until the delay is complete.  It is used to heat up the material and initiate the burning process.  Delay in ms for 3D printers and seconds for GRBL.
  • Passes:  If cutting, this will repeat the entire path by the number of passes.  If engraving leave as 1.
  • Pass Depth:  This will move Z axis down by this amount for each pass.  For example, 3mm piece of material with 3 passes might use 1mm per pass to cut all the way through.
  • Directory:  The directory to store the file.
  • Filename:  Name of the file.
  • Add numeric suffix to filename:  Adds a number to the name in case there already is a file with the same name in the directory.
  • All Units: Change the units to either mm or inches.  This will make everything in inches or mm.
  • Live preview:  Shows the path being generated.
  • Apply:  Click to run the converter.

Inkscape 0.92.4外掛MI新增方法如下: 

擴充功能的外掛程式資料夾(MI & Laser)


擴充功能的外掛程式

複製到目的地


打開Inkscape軟件擴充功能就會出現

Inkscape 1.0.1外掛MI新增方法如下(但是裝完不能用):

偏好設定或參考設定

內有擴充extensions資料夾位置

將MI內的檔案複製過去

執行inkscape在擴充功能


G-Code Sender部分,簡稱UGS 

使用UGS讀取"servo.gcode",然後傳送至Arduino寫字機開始動作。

*請注意圖面必須是40mm*40mm大小,因為光碟機行程不夠大只有40mm。


也可以使用"grblcontroller361setup"軟體,只不過這個軟體在手動JOG會比較鈍一點,且偶爾會當機。 (目前最新版本為3.6.1)


--其他資料參考

https://blog.csdn.net/acktomas/article/details/104439903
這一篇不錯,寫得很詳細。

1.   Arduino IDE Library
Link to download GRBL Setup
,兩種版本
grbl V0.9------grbl 1.1

2.   Download the library file unzip it and load to arduino

支持Arduino單片機的GRBL項目 用該項目做的雕刻機功能專業強大,但是新版1.1只支援Z軸使用步進電機做雕刻部分。不支持舵機。(因為抬筆落筆動作要乾脆俐落,所以如果只是做繪圖器的話我建議首選舵機)我們就使用舊版的固件0.9
PS:
由於版本原因,從上面連結下載V0.9V1.1都不能正確控制舵機,因此,還是需要下載我提供的套裝軟體中的MIGRBL固件, 也可以參考:GRBL CNC Shield + Z Axis servo MIGRBL


另外一個固件,此固件可以試試:robottini/grbl-servo
固件的安裝方法:下載直接在ArduinoIDE功能表裡面點專案→載入庫→添加一個ZIP庫→選擇下載包添加,然後回到功能表:檔→示例→MIGRBLgrblUpload 上傳到Arduino裡即可。這套代碼基本適用於Arduino比較常用的板子,建議就用UNO,另外還需要一個專用的CNC擴展板以及兩塊A4988步進電機驅動板。

3.   InkScape

·         用於生產GCodeinkscape 官方地址1,因為MI擴展外掛程式已經不再更新,能支持inkScape的最新版本是0.48.5.

·         伺服電機控制擴展:按一下此處下載

      4.   UCGS—通用G代碼發送器:

·         最新版本下載位址:https://github.com/winder/builds,下載方式:此種下載方式肯定有問題,隱隱約約覺得應該用git pull命令,先留下記號吧!


GRBL參數中的脈衝計算

1. 計算每毫米的脈衝數公式

光碟機特點:每步18度(一圈20步),絲杆直徑一般為3mm,絲杆螺距為3mm,也就是步進電機每轉一圈,移動距離為3毫米,
咱主要修改脈衝數脈衝/mm這個參數

2. 首先你必須知道你買的滑台的以下參數


即每轉一圈需要20個脈衝(步)

3. 驅動每一步的微步數:16,驅動選擇多少細分就是多少

這個參數計算方法如下


按照上面給出的計算公式

·         不細分: (20×1)÷36.666

·         2細分: (20×2)÷313.333

·         4細分: (20×4)÷326.666

·         8細分: (20×8)÷353.333

·         16細分: (20×16)÷3106.666

還有,另一種方式可以轉G碼。就是下載安裝"MakerBot Unicon"擴充軟體包,安裝成功後可以另存新檔選擇文件類型為"MakerBot Unicon Gcode"就行。


材料清單:

·         Arduino UNO--------------------------------------數量- 1

·         CNC V3 Shield------------------------------------數量-1

·         servo motor----------------------------------------數量-1

·         A4988 Stepper driver shield--------------------數量-2

·         Old scrap DVD Drives---------------------------數量-2

·         Some push buttons as limit S/W---------------數量-2

·         A acrylic sheet for base(亞克力板)

·         Pen holder (slavege from DVD Drive)

·         Some wires

需要清楚電機的參數:步距角(一個脈衝的角度變化我的是0.9度),工作電壓,以

及線序(A+,A-,B+,B-對應的顏色)

擴展板上每個A4988下面需要三個跳線帽,決定細分數,三個都接上。

旁邊四個針腳順序是B+A+B-A-。他們就是接步進電機的位置了;

接錯了,電機不動且有哢哢聲,接對了,電機動,也會有較為不同的聲音,正常

的。

**如果遇到工作時聲音很大和電機發熱嚴重就要適當調節A4988上的旋鈕(逆時針)

限位元開關是可選的(Limit switch are optional)

您可以通過如下更改GRBL設置來使用它們

(You can use them by changing the GRBL setting as below)
$21=0 (hard limits, bool)
to
$21=1 (hard limits, bool)


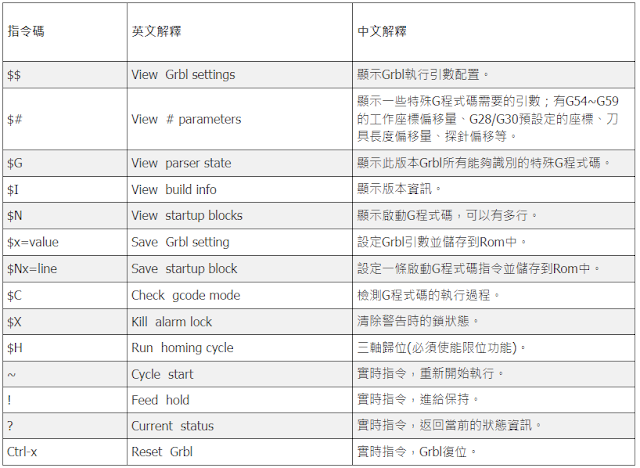
Grbl引數配置說明
$0=10 (steppulse, usec) 步進脈衝時間,建議10us
$1=25(step idle delay, msec) 步進電機除能延遲時間
$2=0 (stepport invert mask:00000000) 步進電機驅動埠有效位掩碼
$3=6 (dirport invert mask:00000110) 步進電機驅動方向位掩碼
$4=0 (stepenable invert, bool) 步進電機使能取反有效位設定
$5=0(limit pins invert, bool) 限位IO口取反有效位設定
$6=0(probe pin invert, bool) 探針IO口取反有效位設定
$10=3(status report mask:00000011) 狀態報告掩碼
$11=0.020(junction deviation, mm) 節點偏差
$12=0.002(arc tolerance, mm) 圓弧公差
$13=0(report inches, bool) 位置座標的單位設定
$20=0(soft limits, bool) 軟限位開關
$21=0(hard limits, bool) 硬限位開關
$22=0(homing cycle, bool) 歸位使能位
$23=1(homing dir invert mask:00000001) 歸位方向位掩碼
$24=50.000(homing feed, mm/min) 歸位進給速率
$25=635.000(homing seek, mm/min) 歸位快速速率
$26=250(homing debounce, msec) 歸位邊界反彈時間
$27=1.000(homing pull-off, mm) 歸位點座標離限位器觸發點的距離
$100=314.961(x, step/mm) x軸速度轉化引數 步/毫米
$101=314.961(y, step/mm) y軸速度轉化引數 步/毫米
$102=314.961(z, step/mm) z軸速度轉化引數 步/毫米
$110=635.000(x max rate, mm/min) x軸最大速率 毫米/分鐘
$111=635.000(y max rate, mm/min) y軸最大速率 毫米/分鐘
$112=635.000(z max rate, mm/min) z軸最大速率 毫米/分鐘
$120=50.000(x accel, mm/sec^2) x軸加速度 毫米/(s*s)
$121=50.000(y accel, mm/sec^2) y軸加速度 毫米/(s*s)
$122=50.000(z accel, mm/sec^2) z軸加速度 毫米/(s*s)
$130=225.000(x max travel, mm) x軸最大行程
$131=125.000(y max travel, mm) y軸最大行程

$132=170.000(z max travel, mm) z軸最大行程